Showing posts with label Ruin. Show all posts

Sunday, 24 August 2014

64. Ya-ho! I did it! 40k Urban Terrain - Crashed Lanspeeder part 5. Project Completed

Welcome back to The Underhive Hero.

I know it has been to long my friends (and enemies and passers by), but at last, we have some progress.

A short one, but for me, personally, a very satisfying one.

med_gallery_33843_7957_106912.jpg


med_gallery_33843_7957_838066.jpg


med_gallery_33843_7957_893202.jpg

A finished piece of terrain! *Cheers*

I'm hopefully planning to keep this painting ball rolling.
On my desk currently is the crashed Aquilla lander, Coteaz and my Ork Bloodbowl team.

If these go down well, I'll move on to my Escher Gang again and try and finish my Human Bloodbowl team.


There has been a lot of changes in the world of 40k since I started this Piece of terrain;
New Rules, New Grey Knights...

I'm in the process of cobbling together a wargamming group, so hopefully that will drive my urge to hobby.
Indeed this is the fruit of those labours so far.

Anyway,
Stay tuned for more updates, and/or/please head over to The science of selling yourself short for my 'IRL' blog and also to catch up on 'The Cardboard Cartographer,' my board gaming blog, which is back to updating fairly regularly (fingers crossed).


In the mean time please feel free to leave my some feedback on this, and/or other stuff on The Underhive Hero.
Comment on this post, on my Armies of the Imperium Wip thread on the Bolter and Chainsword, or hit me up @DarKHaZZl3 on Twitter.


Thanks for reading.

-DH-

Monday, 19 May 2014

57. Unto the Anvil of war...but not that *smash*. 40K Urban Terrain - Crashed Landspeeder part 4.

More painting is to be had, yo'!

But first; excuses and shameless plug!

I've been busy trying to buy battle fleet Gothic stuff (so, so hard these days!)
I also posted a new board game review on The science of selling yourself short -  http://darkhazzl3.blogspot.com/
To top it all off my mouse is playing up.


Anyway!
This Landspeer is in your underhive, smashing up your buildings.


med_gallery_33843_5272_177632.jpg


med_gallery_33843_5272_333329.jpg


med_gallery_33843_5272_1375360.jpg

Just layers and some highlighting done.
Also some weathering.

I'm really pleased with how the mud effect came off on, especially on the destroyed wing in the bottom of picture three.
I did overdo the highlighting on the intact wing though...

The photo quality does wash out the clarity of the highlights.
That said I don't want to go over the top. It isn't meant to be the brightest of places...


Next steps for this are;
Adding the gold and brass trim to the destroyed floor tile and Landspdeer respectively.
Adding some Salamander Iconography to the hull of the Landspdeer,
Painting the interior and the engine.
I'll finish it all off with some battle damage on the speeder, water effects for the mud and gloss varnish for the marble floor tile.


So yeah. That is all for now.

Feedback welcome, as always.

You can hit me up here, or @DarKHaZZl3 on twitter.

Thanks for reading!

-DH-

Thursday, 8 May 2014

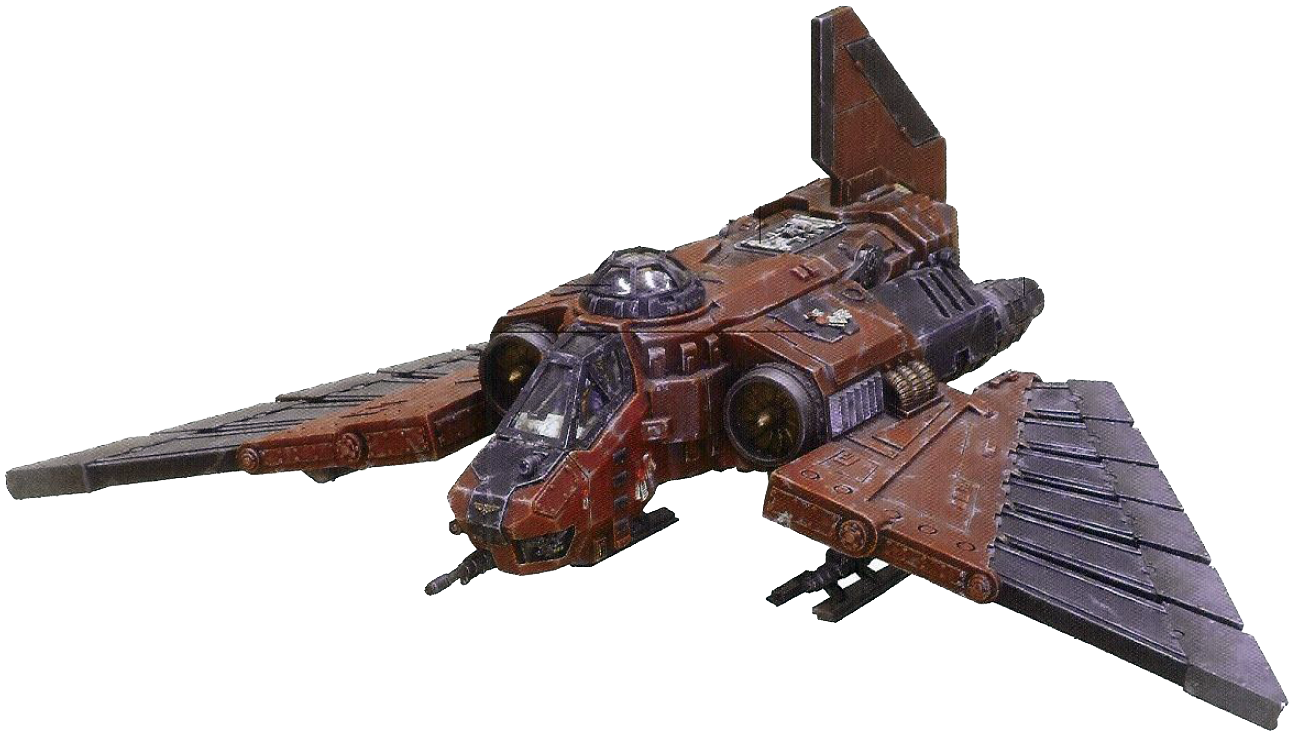
56. It Came From Urban Space. 40K Urabnd Terrain - Crashed Aquila part 1.

Ah, yet another visit to the Underhive!

 A little foreshadowing here.

Back in 2009 I started working for Games Workshop. It was awesome (most of the time).
When I first started 40K was running in 4th edition, and the starter set was The Battle for Macragge.
I didn't get a copy, because I was already building up a crazy amount of Space Marines.

The summer I joined saw the introduction of 5th edition, and the Assault on Black Reach est.

Now I don't know if you've ever been to a Games Workshops tore (you totally should), but they have an 'open copy' of the current starter set so you can see what is inside, which is really usefull for new gamers.

I digress...
The old 4th edition open copy was thrown in the stores Bitz box. This is exactly as awesome as it sounds, and will undoubtedly make an appearance in a future story.

I asked my then manager if I could nab some stuff from the set that I'd missed... namely the terrain.
So I did... and I've done nothing with it for all this time... 5 YEARS!


I've finally got round to painting it!
So here is the wip;

med_gallery_33843_5272_1066425.jpg

The model is already lightly textured, but I did add some extra rubble to tie in with my Urban ruin theme.

med_gallery_33843_5272_1108536.jpg

The metals are done in a rough fashion to help give an aged and beaten feel.

There are many ways to do this, but I thought I'd do it in homage to one of my former co-workers.

This is the Sam Mouzer method of painting metal

First off, undercoat the model black,
Then follow that with an extremely heavy drybrush of tin bitz,
Then a lighter coat boltgun metal,

And that'd usually do it....
But I added an even lighter coat of chainmail,
and finally very lightly with mithril silver.

Finish it off with a wash of a desired colour to shade it where necessary.


This was done on all the ship parts.
Those parts that have colour were painted on top this...

med_gallery_33843_5272_1404350.jpg

med_gallery_33843_5272_1462168.jpg

med_gallery_33843_5272_421949.jpg

The red is just a base of foundation red, and then progressive layers of red; from scad to blood.

For those wondering I used the Forgeworld colours as the inspiration for my colour scheme.
You'll have to either check out this link HERE or Google it as,

A) I don't own one (painted or otherwise),
B) Forgeworld have discontinued the complete model,
and
C) The best Google image is far too large for this blog and I cba to scale it down/ don't own the rights to it...


So that's another project added to my huge list of things to do....
Yay!

-DH-

Monday, 5 May 2014

55. Urban: Dense population? Where are the buildings?! 40K Urban Terrain - Imperial building part 1.

HERETICS!
SET YOUR GAZE UPON THIS CREATION OF THE EMPERORS DIVINE MAJESTY AND WEEP!

Or in other words, I've been doing some more terrain stuff; this time an Imperial Building.

On my post of the WiP of the crashed land speeder I mentioned the tiles would be painted in a similar fashion to one of my other terrain WiP's; this is the WiP

med_gallery_33843_5272_963584.jpg

med_gallery_33843_5272_855217.jpg

med_gallery_33843_5272_443916.jpg

med_gallery_33843_5272_1295401.jpg

med_gallery_33843_5272_321949.jpg

med_gallery_33843_5272_547108.jpg

Yep, it is your bog standard Imperial building from some of GW's cities of death terrain.

The tiles were my first attempt at simple marble effect paintjob.

The tiles start off brown (I undecorated the building brown for some reason...),
Painted over in Dheneb stone,
Then a light dry brush of Dheneb and Skull white,
Finally I washed with Army Painter Soft Tone.

I repeated the process a few times until I was relatively happy with the stained effect.
I finished up with a coat of gloss varnished (which you can't see in the pictures).

The tiles look okay, but too simple for a realistic marble effect.
I'm going to leave these ones as they are. but in future I'll be trying to throw different colours into the mix to give it a more layer effect.
Also, I'll be making it more bright by adding layers of very light bone.

If that doesn't go well I'll try black marble...


That is all for now.
I might post another update later on/ or in the next few days, which will again, be something unrelated...

TOO MANY PROJECTS!!

In the meantime, feel free to comment, suggest things and leave feedback!
Especially if you have experience painting marble that you'd like to pass on to me.

Peace out!

-DH-


PS. I thought I'd give a shout out to some of the guys over at The Bolter and Chainsword for constantly supporting my hobbying, and giving me feedback and suggestions along the road.

The biggest shout goes to deathspectersgt7 and Jaspcat who have followed my progress pretty much constantly for the last couple of years, which is awesome!
They also float around the B&C making it a nicer place to lurk and post. Check out there stuff (click on their names)
I'd also like to thank all the other guys who pop up now and again. I really appreciate the input. Even those who just 'like' the content I put out; it is nice to know someone is reading.


Thursday, 1 May 2014

54. Bad Casting. 40K Urban Terrain - Pavement Side Crater part1.

In one of my posts on the Underhives bulletin board (I don't know what I'm talkign about), I was talking about casting some stuff for making terrain.

The basic story is, on what once was a fairly nice bi-weekly trip to a local town, I picked up a plaster cast kit at a charity shop (which was pretty random, I'll admit).
I bought it because
A) It was from the British Heart foundation (Y)
B) It was cheap
C) Why not? If I could make something usfull with it, then we we're onto a winner.

A while back (when I got the hobby bug again) I thought I'd try it out.
So I grabbed a couple of the Rhinos from my 'car pool,' and...


What?!


THE BUBBLES!!


Needless to say, it did not go well at all.
I know when casting you're meant to tap/vibrate the mould/surface to aid in releasing the air bubbles, but it just didn't seem to work.
I've cast many smaller pieces before using a two part liquid silicone.
This stuff was a 1 part powder and 1 part water mixture.
It just... NO!


The good thing about plaster of Paris is that it is fairly malleable, so it was fairly easy to get rid of those crazy air bubbles.


Looking a'ight for ruined vehicles?
That is what I thought! So I continued on, but it wasn't long until I found another problem.

I'll get to that in a moment.


With these new found trashed vehicles, I thought I'd do some more themed terrain.

Enter the crater;


This terrain piece, like all my others, tells a a little story about what has been happening on this battlefield (in relation to my armies).
In this piece the Space Marine (Probably a Marines Malevolent captain) lies dead in the crater left behind by an explosion.

The cause of the explosion? The destruction of his command Rhino;


I love the concept.

I was going to add large chunks of shrapnel to make it look like it had one of its flanks and part of the under carriage blown out by a mine or something.
This would visual explain why it is in the position it is in.
The Marine would be one of the casualties thrown clear from the wreckage.


All going well? WELL FUCK YOU DARKHAZZL3!

Here is where we return to the aforementioned problem.

PLASTER OF PARIS WONT GLUE TO ANYTHING FOR LOVE NOR MONEY!

Seriously!
I tried Super glue, Plaster of Paris, Polly filler, green stuff, milliput., PVA...
You can't pin it either, or it just crumbles.


So this terrain piece will likely be the last to be finished (if ever!), as I figure out a way to fix the rhino to the base, or just re- model the crater a bit to make it look like one created by an artillery shell (maybe from the entrenched gun position).

Either way. I promised a post about this experiment.
So unto you; The Underhivers, I deliver.


If you have any experience with Plaster casting then feel free to drop me a comment.
Weather it is words of advice, words of frustration or examples of casts done by you.
You can do it below this post, or at my WiP on the Bolter&Chainsword!
Failing that you can tweet me @Twitter - @DarKHaZZl3

Until next time.
-DH-

Thursday, 27 March 2014

49. Fire in the Hole! 40k Urban Terrain - Gun Emplacement part 1.

Whilst designing  terrain I've been thinking of generic terrain types (buildings and craters and such), and themed terrain.
The generic one takes care of itself(ish).
The themed on the other hand, requires a bit more forethought.

The one question I've been focusing on is; 'What armies are going to fight here?'
It is an Imperial World. Couple that with the armies I collect/intend to collect, and you have a starting point.

So far we have the Space Marines Land Speeder. I also have some Sisters themed terrain in the works.
In terms of 'generic theme,' these both don't necessarily fit.
These are both situational; Space marines may, or may not be present.


So what will?

Imperial focres of some variety no doubt. More than likely the planetary defence force.
For all intents and purposes the Imperial Guard.
So I tried to make something bassed around the material they would employ, without being to flash.

I decided to start with a fortified gun emplacement.
First step was to Create the base.
This was just some cork tile stapled to some hardboard and cut to shape using a jewellers saw.


Then it was time to play around with some fortifications.

I didn't want to buy another Aegis defence line, also I didn't want anything drastically detailed like the modifications I'd made to mine.
I wanted something that looked like it could be mass produced quickly, and put up in a hurry.
Something prefabricated and modular (that word again!).


Some wall pieces from the cities of death sprue and some high density foam/ Styrofoam/ insulation foam.
That'll do!


Next I wanted something to add a bit of variety and bite.
I thought I'd take something that time forgot out of my bitz box.


I wasn't too happy with these as they were.
They obviously are not made to stand alone, and together they look...well...


Odd?
A bit too uniform, but at the same time, not symmetrical enough (they sort of 'bend' in the middle).
Good old third edition terrain ¬_¬.


A quick google search gave me this...


So, I set to work modifying mine to better reflect reality.


As the pictures show, I just cut off the offending bits, drilled a hole in the middle, stuck a kebab skewer through and cut it to size.
I think it looks much better.
I could have attached a girder instead, but this was simpler,cheaper and just as effective.


Here's a mock up of the wall sections and the tank traps, with the gun I'm using.


The next step was to attach the fortifications to the board and add some basic details to the base.


+ bonus action shot.


I just used a knife and a screw driver to dig out some small blast craters.
A fortification in a war zone is bound to attract fire.
The green rings around the ridge are just green stuff to represent the displaced earth.
When I base it later these will be left open so I can augment them with filler and other materials to make them more pronounced.
Can't have a completely flat board now can we? :P


That is all I managed on that day.

I picked up the project again a day later and set about pepping the base with some more details so it was ready for texturing later on.


And a close up.


This is the same as the Land Speeder in terms of materials used;
Filler, bits of small and large slate.

I had to put filler on the walls to stop them from melting when I undercoat it (if I use spray...I'm undecided).
It needs sanding down to even it out, and then I can put the first layer of sand on the base.
I also want to flesh out the entrenched gun. I don't think it looks Imperial enough.
Needs some tech gubbins and iconography.


Anyways.

As usual, all feedback welcome.
Hit me up here, on the B&C of @DarKHaZZl3 on twitter.

Thank you for continuing to read!

Peace!

-DH-

Tuesday, 25 March 2014

47. Get Out, Get Out Now! 40k Urban Terrain - Crashed Land Speeder part 1.

Never have I seen such a wretched hive of scum and villainy...

Oh wait, it's the UnderHive. Of course I have!

Welcome back!
Guess what? I finally managed to get my phone working again.
You know what that means?! ACTUAL UPDATES!

Praise the Omnissiah I guess?

Speaking of Omnissiah...


Got my hands of this bad boy.
I've got to say, overall I'm impressed.
I'm not a fan of big models in games, but I love these guys.
They seem a bit under costed, but time will tell I guess.

My one gripe with the book is that it cost £25. The rules only take up 7 sides of A4 of the 60 something in the book.
Yes it is pretty. but it simply isn't worth the price tag. DO yourself a favour, and buy the eBook version. It is £5 cheaper.


Anyway, moving on.
I promised some actual models and such, so I shall deliver.


As I said before, I'm currently working on several projects (while I wait for my appetite for painting to return).
At the forefront of these are my terrain projects.
There is no point making a board if you have nothing to put on it right?

Considering I have a few projects, with pictures at several stages, I will be posting them individually, over the course of a few days.

So I present to you the (several) stages of one of my terrain wip's; The downed land speeder.

A few (well, more like eight I guess) months back I was given a fair amount of models by a friend whom no longer wished to play.
Some of this stuff was salvageable, although not a great deal; they were from a long time ago, a time when patience was the anti-christ.

One such object was a Land Speeder Typhoon.


So I took it apart. I put the missile bits to one side (Most of these were missing), and had at it!


The general idea is that the Marines took a major hit to one of the rear engines (I have yet to sort the engine block out), and were forced to disembark before crash landing. Will they have survived? Who knows?!


Positioning. Done.

I kind of wanted a little bit of a 'crashed and skidded along the floor' look about the piece.

So after some tearing chunks out and green stuffing I had this;


The main skid track belongs to the Land Speeder, the second its left wing.
They'll be suitably damaged accordingly. I need to get some gun parts from the depths of my Bitz box and/or ebay.

In the meantime (otherwise known as Today), I wanted to press on with what I could do; Adding debris.
While I liked the current pose, that green stuff mound just irked me.

So I soon saw to that!


The debris is made up of a mix of materials.
The White stuff on the floor is my old friend polyfiller. It gives a bit more variety to the ground and makes it less perfectly flat.
The big white chunks are a plaster cast of cities of death floor, tiles smashed up and placed around the crash site; I'll be posting more about plaster casting in another post... so stay tuned for that one.
The rock/stone/slate pieces are a mix of large gardening slate and the smaller slate bits from the GW urban basing kit.

There is plenty more left to be done;
More rocks, bitz, buildings and other generic debris,
I need to sculpt the seats back in,
I need to suitably damage the engine block and custom build the inside,
and once all that is done it needs to be based in line with my board.


So there you have it. A real update, and the first of many.
Hopefully I can finish 5 terrain pieces by this weekend (unpainted, obviously).


Any feedback welcome!
Also, suggestions on other urban terrain ideas.

Thanks for reading.

-DH-